
DIY Compost Bin: An Eco-Friendly Solution

Introduction
Hello there! If you’re looking to enhance your gardening game while reducing waste and nourishing your plants naturally, then creating your very own DIY compost bin is the way to go. Composting is a fantastic way to recycle kitchen scraps and yard waste into nutrient-rich compost that can supercharge your soil. In this article, I’ll guide you through the process of building and maintaining your own compost bin, as well as share some handy tips along the way. Let’s dig in!
Understanding Composting
What is composting?
Composting is a natural process that involves the decomposition of organic matter into a rich soil-like substance called compost. It is a controlled breakdown of materials such as food scraps, leaves, grass clippings, and other organic waste, facilitated by microorganisms like bacteria, fungi, and worms. This transformative process produces a nutrient-dense material that can improve soil fertility and promote healthier plant growth.
Benefits of composting
Composting offers a wide range of benefits. Firstly, it reduces the amount of waste going to landfills, which helps to mitigate environmental issues. Compost also enriches the soil, enhancing its structure, water-holding capacity, and nutrient content. By using compost in your garden, you can boost plant health, increase crop yields, and reduce the need for synthetic fertilizers. It’s a win-win situation for both you and the environment!
Why DIY Compost Bins?
Cost-effectiveness
One of the primary reasons to opt for a DIY compost bin is its cost-effectiveness. Creating your own compost bin allows you to repurpose everyday materials and avoid spending money on commercial options. With a little creativity, you can construct a highly functional compost bin that fits your budget.
Customizability
DIY compost bins provide an excellent opportunity for customization. You can tailor the size, design, and features of the bin to suit your specific needs and available space. Whether you have a small balcony or a sprawling garden, there’s a DIY compost bin solution that will work for you.
Environmental impact
Building your own compost bin aligns perfectly with sustainable living principles. By reusing materials and reducing waste, you contribute to the preservation of natural resources. Additionally, composting reduces greenhouse gas emissions associated with landfilling organic waste. It’s an eco-friendly choice that makes a real difference.
Choosing the Right DIY Compost Bin
When it comes to selecting the right DIY compost bin, several factors should be considered:
Size and capacity
The size of your compost bin should match the amount of organic waste you generate. If you have a small household or limited space, a compact bin will suffice. However, larger families or avid gardeners may require a larger capacity bin to accommodate their needs adequately.
Materials
The choice of materials for your compost bin is crucial for its durability and functionality. Common options include wood, plastic, and wire mesh. Each material has its advantages and considerations, such as cost, ease of assembly, and the ability to retain heat and moisture.
Design and functionality
Consider the design features that will facilitate the composting process. Features like removable panels for easy access, aeration vents, or a dual-chamber design for efficient compost production are worth exploring. Select a design that aligns with your goals and ensures a hassle-free composting experience.
Building Your Own Compost Bin
Selecting a location
Before constructing your DIY compost bin, identify a suitable location in your yard or garden. Choose a level area with good drainage and access to sunlight, as these factors promote decomposition and discourage odor and pest problems.
Basic tools and materials
Gather the necessary tools and materials for your compost bin project. You’ll likely need items such as a saw, drill, hammer, nails, screws, wire mesh, or other building materials depending on your chosen design. Don’t forget to ensure your safety by wearing gloves and protective gear when working with tools.
Step-by-step construction
Now, let’s dive into the step-by-step process of constructing your DIY compost bin:
- Prepare your materials and tools.
- Measure and cut the necessary pieces according to your chosen design.
- Assemble the base or frame of the compost bin.
- Attach the walls or panels securely, leaving space for airflow.
- Add a hinged or removable top for easy access and maintenance.
- Ensure the bin is stable and properly anchored.
- Test the structure’s stability by gently shaking it.
- Congratulations! Your compost bin is ready to be filled.
Maintaining Your DIY Compost Bin
Adding the right ingredients
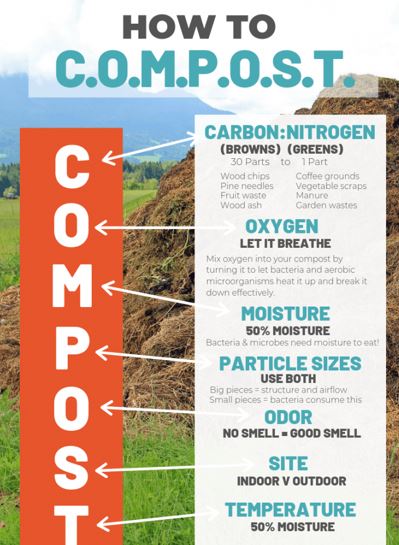
To maintain a healthy compost pile, you’ll need to add the right mix of organic materials. Aim for a balance between “green” nitrogen-rich materials like fruit and vegetable scraps, coffee grounds, and grass clippings, and “brown” carbon-rich materials like dry leaves, twigs, and shredded paper. Alternate layers of these materials to encourage decomposition and prevent odor problems.
Monitoring moisture levels
Keeping an eye on the moisture content of your compost pile is essential. It should resemble a wrung-out sponge, moist but not overly wet. If the pile becomes too dry, add water using a watering can or hose. Conversely, if it becomes too wet, mix in dry materials or turn the pile to improve aeration and drainage.
Turning and aerating the compost
Regularly turning or aerating the compost pile helps accelerate the decomposition process. Use a pitchfork or compost aerator to mix the materials, ensuring oxygen reaches the microorganisms responsible for breaking down the organic matter. Aim to turn the pile every few weeks or whenever it becomes compacted.
Troubleshooting Common Issues
Odor problems
Unpleasant odors may arise if the compost pile lacks airflow or contains an imbalance of materials. To combat this issue, turn the pile more frequently, add dry materials, and avoid adding large amounts of meat, dairy, or oily foods. Proper aeration and a balanced mix of materials should help eliminate odor problems.
Pest control
While composting can attract some insects, certain pests like flies and rodents can become problematic. Avoid adding meat, dairy, or oily foods that attract pests. Additionally, consider covering your compost pile with a tarp or using a compost bin with a secure lid to deter unwanted critters.
Slow decomposition
If your compost pile isn’t decomposing as quickly as expected, it may require adjustments. Ensure the balance between nitrogen-rich and carbon-rich materials is maintained. Chop or shred large items into smaller pieces to facilitate breakdown. Increasing the pile’s size can also help generate more heat, accelerating decomposition.
Harvesting and Using Compost
Signs of mature compost
Compost is considered mature when it has a dark, crumbly texture and an earthy smell. The original materials should be unrecognizable, and there should be no traces of rot or mold. It usually takes several months to a year for compost to reach this stage, depending on various factors like temperature and the size of the compost pile.
Harvesting methods
To harvest your compost, stop adding new materials to the bin and let it rest for a few weeks. This resting period allows any remaining organic matter to break down fully. Once ready, you can use one of the following methods:
- Screen the compost to remove any large particles or debris.
- Use a “continuous harvest” method by removing mature compost from the bottom of the bin while leaving the rest intact.
- Empty the entire bin and start a new composting cycle, using the mature compost in your garden or flower beds.
Utilizing compost in the garden
Once you have harvested your compost, it’s time to put it to use in your garden. Mix the compost into your soil to improve its structure, moisture retention, and nutrient content. You can use compost as a top dressing, incorporate it into planting holes, or create a compost tea to nourish your plants. Your garden will thrive with this nutrient-rich boost!
Conclusion
Congratulations! You’ve now gained the knowledge and insights needed to embark on your DIY compost bin journey. By composting your organic waste, you’re making a positive impact on the environment while reaping the benefits of nutrient-rich soil for your plants. Remember to choose the right DIY compost bin, build it with care, and maintain it regularly. Soon enough, you’ll be harvesting your own compost and witnessing the amazing transformation it brings to your garden.
FAQs
1. How long does it take to make compost in a DIY compost bin? Composting times can vary depending on factors like temperature, the mix of materials, and how often you turn the pile. Generally, it takes several months to a year for compost to fully mature in a DIY compost bin.
2. Can I compost meat and dairy products in my DIY compost bin? It’s best to avoid composting meat, dairy, and oily foods in a DIY compost bin, as they can attract pests and slow down the decomposition process. Stick to fruit and vegetable scraps, coffee grounds, leaves, and other plant-based materials.
3. Will a DIY compost bin smell bad? If your compost bin is properly maintained and balanced with the right mix of materials, it shouldn’t produce strong odors. Regular turning, proper aeration, and avoiding excessive moisture will help prevent unpleasant smells.
4. Can I use my DIY compost in potted plants? Absolutely! Compost is excellent for potted plants as it enhances soil structure and provides essential nutrients. Mix compost with potting soil in a 1:1 ratio for optimal results.
5. What should I do if my compost bin attracts pests? If pests become a problem, avoid adding meat, dairy, or oily foods to the compost bin. Consider covering the bin with a secure lid or using a tarp to discourage unwanted critters. Turning the pile frequently can also help deter pests.
Remember, creating your DIY compost bin is not only a rewarding project but also a sustainable solution for reducing waste and improving your garden’s health. Happy composting!


